Structure of the Graphical User Interface

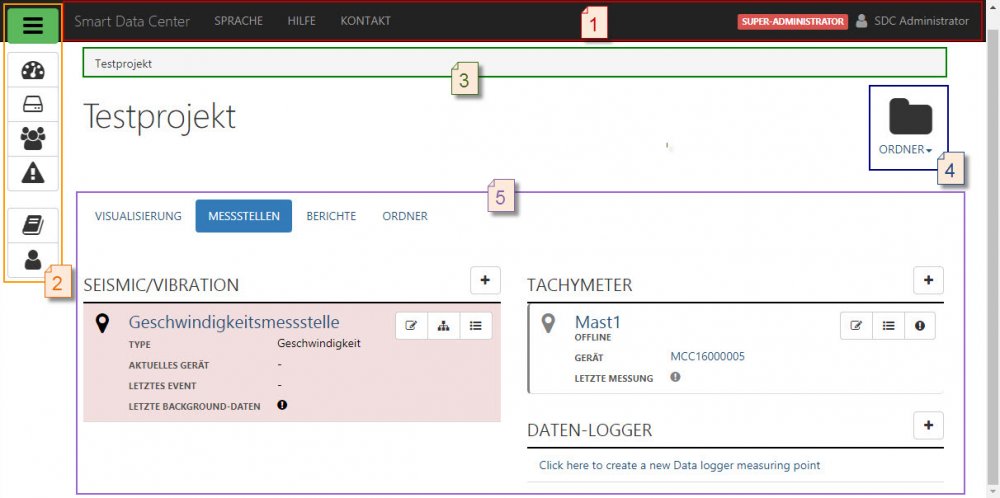
The graphical user interface, as it is displayed in your browser after successfully logging in, is made up of the following areas and elements:
Header
The header contains links to general settings and information, such as the language settings under “Language”, where you can select the language to be used by Sedrix to display labels and texts in the web interface, or a link to this manual under “Help”. At the far right of the header you will see the role - in the screenshot, this is “super-administrator” (see the section on user roles for more details) - as well as the name of the user who is currently logged in.
For more details, see the Header section.Menu
The vertical menu bar consists of a series of shortcuts, i.e. buttons with special icons that can be clicked to quickly reach the most important views. Clicking on the green "hamburger button" at the top leads directly to the main menu, which is otherwise hidden (see below). The shortcuts that are displayed in the menu depend on the rights of the logged-in user and the type of licensing.
For further details, see the Menu section.Navigation bar/Address bar
The navigation bar shows you the hierarchical position at which you are currently located as a “path specification”, starting from the name of the project.Context menu
For each element displayed in the data/workspace, an icon symbolizing that element is displayed in the upper right corner. The label below it identifies the element even more specifically, followed by a small black triangle. In the screenshot, the element is a folder.
Clicking on either the name or the triangle opens a context menu with commands that can be applied to the item. Typically, this menu provides (among other things) a command to open the edit mode of the item, or to update the view.
For more details, see the Context Menu section.
Data-/Workspace
This is the main area of the interface and its content depends on which navigation element is currently selected. Within the areas accessible by clicking on the tabs “Measuring points”, “Folders” and so on, lists of the corresponding objects are displayed in a table as an overview.Main menu (not visible in screenshot, because it is currently hidden)
This menu - normally hidden - contains in particular the project tree (mentioned below), as well as a number of further text links for accessing frequently used views (analogous to the equivalent shortcuts in the menu; again dependent on the rights of the user). The main menu is opened by clicking on the green "hamburger button" . In doing this, a different menu is hidden. For more details, see the Main Menu section.
Edit mode: The above screenshot specifically shows the view of a folder, which only displays its contents. The "Edit" command of the context menu explained above takes you to another, special *view for editing* the folder. This principle is also valid for all other (editable) elements in Sedrix like measuring points, devices or projects: in addition to a pure display mode, there is a special mode for editing. This will usually be referred to as the Edit mode, and can be accessed via the context menu of the object or by clicking on one of the “Edit” buttons that are displayed on the right side of each line of a list view of objects, such as the list of subfolders of a folder. However, the edit mode is only accessible to the logged-in user if they have the corresponding rights (as explained in more detail below).
Sedrix works according to projects. The available/displayed data is always that of the currently selected project! (See the Important Terms section.)
