
Description of the Graphical User Interface
Structure of the Graphical User Interface
The graphical user interface (GUI) of Sedrix, as it is displayed in the browser after successfully logging in, can be divided into the following areas (see screenshot). For the names of GUI elements used here and in the following sections, see also the Glossary, especially the Controls section:
Header
The header contains general functions and information, such as "Language", where you can select the language to be used for displaying labels and texts in the Sedrix web interface, or "Help", where you will find a link to this manual.
In addition, the role of the user is displayed on the far right of this line. In the screenshot, this is "Super Administrator" (see User Roles). The (display) name of the currently logged-in user is also displayed.
For further details, see Header.Menu
The vertical menu bar consists of a series of shortcuts, i.e. buttons with special icons that can be clicked to quickly reach the most important views. Clicking on the green "hamburger button" at the top leads directly to the main menu, which is otherwise hidden (see below). The shortcuts that are displayed in the menu depend on the rights of the logged-in user and the type of licensing.
For further details, see the Menu section.Navigation bar/Address bar
The navigation bar shows you the hierarchical position at which you are currently located as a “path specification”, starting from the name of the project.Context menu
For each element displayed in the data/workspace, an icon symbolizing that element is displayed in the upper right corner. The label below it identifies the element even more specifically, followed by a small black triangle. In the screenshot, the element is a folder.
Clicking on either the name or the triangle opens a context menu with commands that can be applied to the item. Typically, this menu provides (among other things) a command to open the edit mode of the item, or to update the view.
For more details, see the Context Menu section.
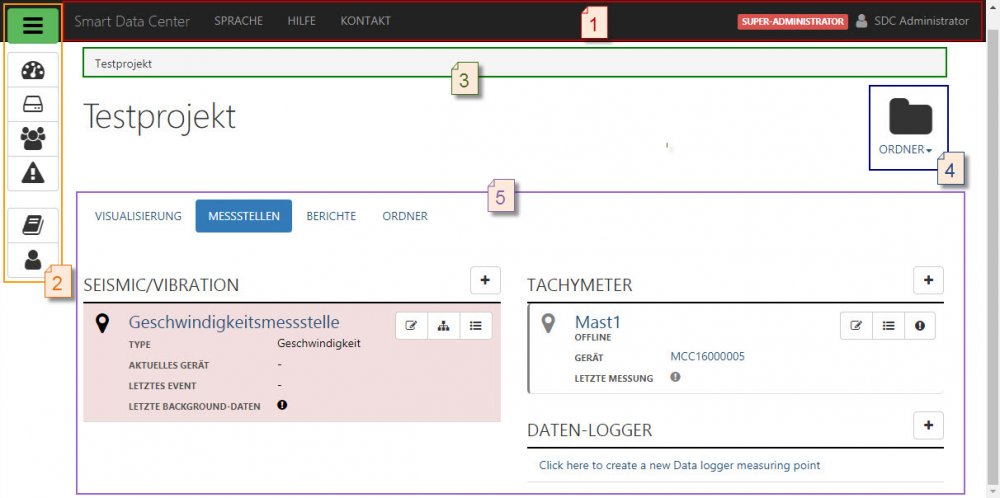
Data/Workspace
The main area of the interface whose content depends on the navigation element that is currently selected. Within the areas accessible by clicking on the tabs “Measuring points”, “Folders” and so on, lists of the corresponding objects are displayed in a table as an overview.Main menu (not visible in screenshot, because it is currently hidden)
This menu - normally hidden - contains in particular the project tree (mentioned below), as well as a number of further text links for accessing frequently used views (analogous to the equivalent shortcuts in the menu; again dependent on the rights of the user). The main menu is opened by clicking on the green "hamburger button"
. In doing this, a different menu is hidden. For more details, see the Main Menu section.
Edit mode: The above screenshot specifically shows the view of a folder, which merely displays its contents. The "Edit" command of the context menu explained above takes you to another, special *view for editing* the folder. This principle is also valid for all other (editable) elements in Sedrix like measuring points, devices or projects: in addition to a pure display mode, there is a special editing mode. This is hereafter usually referred to as the Edit mode, and can be accessed via the context menu of the object or by clicking on one of the “Edit” buttons 
Sedrix works according to projects. The available/displayed data is always that of the currently selected project! (See the Important Terms section.)
Language of the Sedrix Interface
The language used for the display of labels and text in the graphical user interface of Sedrix can be set in the header via the menu item "Language".
Icons Used


Logbook (as of version 2.11)

Further symbols used in Sedrix


Full screen (from version 2.12)


Vibration event (vibration measurement module)


Input elements (from version 2.11)

Manage measuring points (from version 2.13)


Split assignment


Header
In Sedrix, the header is the top horizontal menu bar with a black background. It contains menu items for selecting general functions and retrieving information.
Under "Language", you can set the language used for displaying labels and text within the user interface of Sedrix. See Language of the Sedrix Interface.
Under "Help", you will find help with operating Sedrix along with contact information:
"Documentation": Link to this handbook
"Changes": Link to the Sedrix Changelog (also in this handbook)
"Contact": Contact data of Remolution Software GmbH and - if they have been entered in Sedrix - the contact data of the contact person specified for the current project.
"Privacy policy": Data privacy statement according to DSGVO (GDPR) for the use of Sedrix.
In addition, the (display) name of the currently logged-in user is displayed on the far right of the header. If this user is a so-called privileged user, their role is also displayed. In the screenshot, this is "Super-Administrator" (see User Roles).
Clicking on the name opens a context menu with commands for managing your own user account and for logging out.
Menu
The menu is the vertical menu bar. It contains several buttons with icons, which can be used to access the most important views and functions of Sedrix ("shortcuts").
Note: The rights of the currently logged-in user determine which of the buttons described below are displayed. More precisely, it is the user group, to which the user belongs, and the license, that determines this. Contact your system administrator if you require access to buttons that are currently hidden.
Main Menu
The main menu, which is accessed via the green "hamburger button" ![]()
the project tree, with which you can navigate within the project
in the upper area, project-specific functions
in the lower area, cross-project or global functions.
To open the main menu, click once on the hamburger button. The main menu will open and the entire menu bar will be moved to the right.
To close the main menu again, click the hamburger button again. The main menu will collapse.
By default, the main menu is hidden in order to have more screen space for the data/workspace, which is especially useful when working with Sedrix on small screens.
Among the project-specific functions are e.g. access to the dashboard, the devices of the current project, user groups, alert definitions etc., as well as access to document templates etc. which can only be found here.
The global functions available here are access to project management, user management, as well as Setup and Status.
Project Tree
The project tree of the current project is displayed when you click on the "hamburger button" ![]()
The hierarchy of folders created in Sedrix to structure a project, as well as the measuring points placed in it, form a "tree". The project folder is at the "root", subfolders and sub-subfolders form the "trunk" or "branches". Finally, the measuring points (and even "empty" subfolders, i.e. folders which don't (yet) contain subfolders and/or measuring points) form the "leaves". This hierarchical structure of the current project is called the project tree and can be viewed in the main menu. This is the same concept as in the navigation area of Windows Explorer, or in the list view of the Finder in macOS, for example, where the hierarchical structure of the file system of a computer with folders, subfolders, sub-subfolders etc. and files can be visualized:
The project folders are displayed in the project tree with the symbol
(closed folder) or
(open folder) followed by the name of the folder. Different icons are used because it can, for the sake of clarity, be helpful to hide items in the project tree by default after a certain level. This is indicated by the closed folder icon (from version 2.12). These folder symbols can be opened at any time by clicking on them, in order to display its contents (if available; see Project Properties for the corresponding project setting).
The measuring points of the project are displayed in the project tree with the symbol
, followed by the name of the measuring point.
Note: It is possible to generally exclude (hide) measuring points from being displayed in the project tree. Such hidden measuring points are only listed in the folder view (with a unique symbol; see Measuring Point Properties for the corresponding "Display in project tree" setting).
Global Functions
The global functions described here are only available to privileged users (super administrators or administrators, see User Roles). Some functions can also be accessed via the corresponding icon in the menu.
Projekte
This function opens the project management view of Sedrix. Here, new projects can be created, existing projects can be edited, and archived or deleted if necessary.
It is only available to privileged users (super administrators or administrators, see User Roles and users with the appropriate rights). This means that the "Projects" link is only displayed in the main menu if you are logged in with the required privileges.
"Projects": Clicking this link opens the Project Management (corresponds to clicking
Users
This function opens the user management view of Sedrix, where new Sedrix users can be created, existing ones edited, and deleted if necessary.
This function is only available to privileged users (super administrators or administrators, see User Roles). This means that the "Users" link is only displayed in the main menu if you are logged in with the required privileges.
"Users": Clicking this link opens the user management (corresponds to clicking
Devices (All Projects)
This function opens a view in which all devices created in Sedrix are listed in an overview (available from version 2.12).
For details, see Cross-Project Device Overview.
"Devices (All Projects)": Clicking on this link opens the device overview for all projects (there is no icon in the menu).
This function requires a separate licensing and is only available to privileged users (super-administrators or administrators, see User Roles). The "Devices (All Projects)" link is only displayed in the main menu if you are logged in with the required privileges.
Setup
This function opens a view that is used to configure Sedrix. This is usually done by your system administrator/sales partner when setting up Sedrix.
"Setup": Clicking on this link opens the "Setup" view (there is no icon in the menu).
This view is only available to super-administrators (see User Roles). The "Setup" link is only displayed in the main menu if you are logged in as such.
Status
This function opens a view for displaying the current status of Sedrix (status information concerning the server; status of services; from version 2019.1, the licensing status is found in a separate license view). It also provides access to log files. It is normally only used by your system administrator/sales partner, if required.
"Status": Clicking on this link opens the "Status" view (there is no icon in the menu).
Logo of the view (upper right): 
This view is only available to super-administrators (see User Roles). The "Status" link is only displayed in the main menu if you are logged in as such.
License
This function opens a view of the current licensing status (from version 2019.1). It is normally only used by your system administrator/sales partner, if required.
"License": Clicking on this link opens the "License" view (there is no icon in the menu).
Logo of the view (upper right): 
This view is only available to super-administrators (see User Roles). The "License" link is only displayed in the main menu if you are logged in as such.
Usage Statistics
This function opens a view of the current usage statistics. It is normally only used by your system administrator/sales partner, if required.
"Usage Statistics": Clicking on this link opens the "Usage Statistics" view (there is no icon in the menu).
Storage requirement and amounts, displayed separately according to application/object
Notifications sent by Sedrix, either by email or SMS
This function requires a separate licensing and is only available to privileged users (super-administrators or administrators, see User Roles). The "Usage Statistics" link is only displayed in the main menu if you are logged in with the required privileges.
Project-Specific Functions
The following project-specific functions/views are accessible via links in the main menu. Some of these links correspond to the respective shortcuts (buttons with icons) in the menu. For details about these views please follow the links below:
Note: The rights of the currently logged in user determine which of the buttons described below are displayed. More precisely, it is the user group, to which the user belongs and the licensing that determines this. Contact your system administrator if you require access to links that are currently hidden.
“Dashboard”: Dashboard (corresponds to
“Devices”: Device Management (corresponds to
“User Groups”: User Group Administration (corresponds to
“Alert Definitions”: Alert Definitions (corresponds to
“Document Templates”: Document Templates (without a shortcut in the menu)
Data/Work Area
The "data area" or "work area" is the main part of the user interface of Sedrix (the section to the right of the menu bar). Depending on the currently selected view/function, different contents are displayed. This could be the data of a specific measuring point . (tables, diagrams, etc.) that was selected, or the properties of a device that was called up in Device Management, etc.
This area is primarily used for *purely displaying* the data or properties of the currently selected element.
If useful for the currently displayed element, a separate Edit mode can be called up here, in order to change (and save) the properties of the element. In order to access this edit mode, please execute the *"Edit "* command in the context menu of the element. In list views of elements (e.g. the list of measuring points of a folder or devices (i.e. the Device Overview) there is also a special "Edit" icon
. Clicking on this icon in a line of the list opens the edit mode of the element in this line.
For example, in the edit mode of a measuring point, the properties of this measuring point, such as assignments, reference measurements, evaluations, etc. have to be defined. This ultimately determines the data displayed in the pure display mode and how it is presented.
In other words, actually working with Sedrix takes place predominantly in this area, while menus and navigation areas are used to select a particular element. This helps to explains the name.
Typically, the data displayed here - as long as it is time-stamped (especially the measurement data, see General Remarks on Measurement Data) - can be temporarily restricted with the so-called “SmartFilter” functionality.
Navigation Bar
The navigation bar is a text line that is displayed at the top of the data/work area and which depicts the "path" to the current view as a "path of objects" (so-called "breadcrumb navigation". See Glossary). It shows you at a glance the current position of the element whose data is currently displayed in the folder hierarchy, and thus simplifies the orientation, especially in a folder or a measuring point view (see project tree)
In addition, you can click on one of the components of this path to go directly and conveniently to the corresponding level, so that the corresponding contents are then displayed.
For example, a line like "Magistrale für Europa / Rheinbrücke Neuburgweier / Tachymeter / Widerlager Ost" shows that you are currently working in the "Magistrale für Europa" project, and that you are in the "Tachymeter" (sub-sub) folder in the "Widerlager Ost" measuring point. Clicking on "Tachymeter", for instance, opens the view of this folder, so that you can see (and call up) other measuring points that may be defined here.
The following rules apply to the creation of these path specifications:
For project-specific views, the path begins with the name of the project or the project folder
for a folder view, this is followed by the names of the folders and subfolders in which the measuring point is located and completed with the name of the current folder
for a measuring point view, it is analogous to the path of a folder view, but is here terminated with the name of the measuring point
in the device management, it is followed by the name of this view (or here shorter the word "Devices"), etc.
For the global views, the project management and the user management, the navigation bar only consists of the name of the view (and cannot be clicked either - which is not helpful here).